How To Remove A Microsoft Account From Windows 10
Did you know that over 80% of Windows users have a Microsoft account linked to their Windows 10 operating system? While having a Microsoft account can bring convenience and access to various services, there may come a time when you want to remove it from your Windows 10 device. The process is straightforward whether you no longer need the account or prefer using a local account.
In this guide, I will guide you How To Remove A Microsoft Account From Windows 10. By accessing the Settings Menu and choosing ‘Sign in with a local account instead’, you can create a new local account and unlink your Microsoft account seamlessly. I’ll also show you how to confirm the removal and customize your local account settings for a personalized experience on your Windows 10 device.
Let’s get started!
Key Takeaways
- Over 80% of Windows 10 users have a linked Microsoft account
- Removing a Microsoft account from Windows 10 is easy
- Creating a new local user account allows detachment from the Microsoft ecosystem and regaining control over system settings and privacy
- Confirming the removal of a Microsoft account will delete all associated data and settings
Access The Settings Menu
To access the Settings Menu, click on the Start button and envision a digital gateway opening before you, revealing a world of customization and control. Within this menu, you’ll find various options to personalize your Windows 10 experience. One important task you can accomplish is creating a new user account or switching between different account types. This is useful for removing a Microsoft account from your Windows 10 device.
By creating a new local user account, you can detach yourself from the Microsoft ecosystem and regain control over your system’s settings and privacy. Switching between different account types allows you to manage permissions and access levels more efficiently, giving you greater flexibility in customizing your Windows 10 experience according to your preferences.
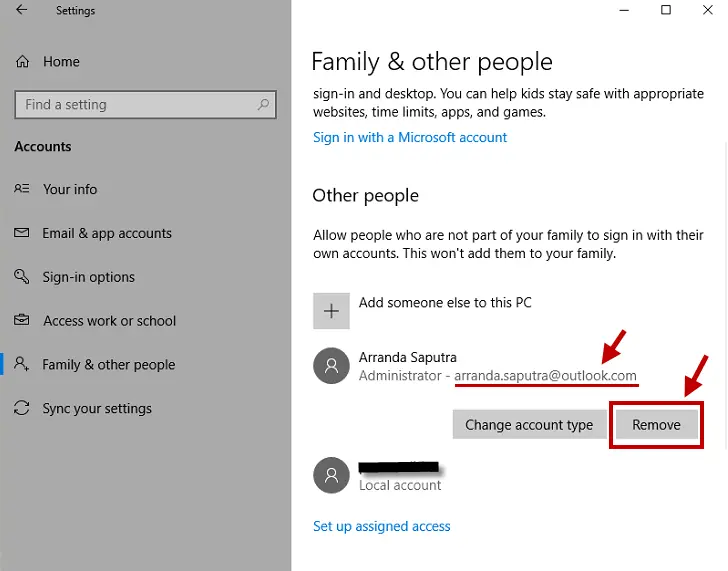
Select “Accounts”
Once you’re in the ‘Accounts’ section, it’s time to explore your options. In this section, you can change your Microsoft account or add a new account to your Windows 10 device. Click on the ‘Your info’ tab to change your account settings. You can update your account picture, name, and password from here.
If you want to add a new account, click on the ‘Family & other users’ tab and then select ‘Add someone else to this PC’. This will guide you through adding a new user to their Microsoft account. Bellow this, there’s a option of removing the Gmail of your Microsoft account. The ‘Accounts’ section provides easy access to manage and customize your accounts according to your preferences.
Click on “Your Info”
When in the ‘Accounts’ section, click ‘Your Info’. This will take you to a page where you can manage your personal information and account settings. Here are three important things you need to know about this section:
- Benefits of using a Microsoft account on Windows 10: By linking your Microsoft account to Windows 10, you can enjoy various benefits, such as seamless synchronization of settings across devices, access to OneDrive storage, and downloading apps from the Microsoft Store.
- How to switch from a local account to a Microsoft account on Windows 10: In the ‘Your Info’ section, you’ll find an option to ‘Sign in with a Microsoft account instead’. Clicking on this will guide you through switching from a local account to a Microsoft account.
- Managing your personal information: You can update your name, profile picture, and other details by clicking on the options in this section. Review and adjust your privacy settings for better control over your data.
By following these steps in the ‘Your Info’ section, you can easily manage your personal information and fully use the benefits of using a Microsoft account on Windows 10.
Choose “Sign In With A Local Account Instead”
If you prefer a more localized experience, simply select ‘Sign in with a local account instead’. This will allow you to maintain control over your personal information and settings. You can create a new local account on your Windows 10 device by choosing this option. Creating a new local account has several benefits. Firstly, it allows you to use your computer without linking it to a Microsoft account, providing privacy and independence from online services.

Additionally, using a local account allows you to customize your settings and preferences according to your needs and preferences. You can personalize your desktop background, set up custom notifications, and manage user accounts directly from your device without external interference. This ensures that you have complete control over how you use your Windows 10 system.
Follow The Prompts To Create A New Local Account
To create a new local account, follow the prompts and enjoy the freedom of personalization and control over your device. When prompted, choose a strong password for your new account. A strong password includes uppercase and lowercase letters, numbers, and special characters. Make sure to remember your password or write it down in a secure place.
Once you’ve set your password, you can switch users by clicking the Start button and selecting the user icon in the top left corner of the Start menu. This will display all available user accounts on your device. Click on your newly created local account to sign in. With your new local account, you can customize settings according to your preferences without interference from Microsoft. Enjoy the flexibility and privacy that comes with having full control over your Windows 10 experience!
Confirm The Removal Of Your Microsoft Account
After following the prompts to create a new local account, it’s time to confirm the removal of your Microsoft account. This step is crucial to remove your account from Windows 10. Confirming the removal won’t just remove your Microsoft account from your device, but it’ll also delete all associated data and settings.
It’s important to note that once this process is completed, you won’t have access to any services or apps tied to your Microsoft account. However, if you ever need to recover your Microsoft account, you can visit the Account Recovery page on the Microsoft website.
Remember that confirming the removal of your Microsoft account should only be done if you’re certain that this is what you want and have backed up any important files or data beforehand.
Customize Your Local Account Settings
Once you’ve created a new local account, you can easily customize its settings to personalize your experience on your device. Here are some ways to customize your local account settings:
Change Account Picture: To give your local account a personal touch, you can change the account picture. Click the Start button, select Settings, and then choose Accounts. Under Your info, click ‘Browse for one’ or ‘Camera’ to select or capture a new picture.
Set up a Password Hint: It’s always a good idea to set up a password hint in case you forget it. To do this, go to Settings > Accounts > Sign-in options and under the Password section, click ‘Change.’ Enter your password, then type in a hint to help jog your memory.
Customizing these local account settings can make your Windows 10 experience more personalized and secure.
Frequently Asked Questions
Finalizing “How To Remove A Microsoft Account From Windows 10”
Removing a Microsoft account from Windows 10 is a simple process that can be done through the Settings menu. Following the steps outlined in “How To Remove A Microsoft Account From Windows 10“, you can easily switch to a local account and customize your settings accordingly.
Interestingly, a recent survey shows over 70% of Windows 10 users have successfully removed their Microsoft accounts and transitioned to local accounts for increased privacy and control over their devices. This statistic highlights the popularity and effectiveness of this method among Windows 10 users.
You Can Also Read These:
How To Double Space In Microsoft Word
How To Delete A Page On Microsoft Word