How To Remove Graphics Card From Motherboard
The process of removing a graphics card from a motherboard is an essential skill for computer enthusiasts and professionals alike. Whether you are upgrading your graphics card or troubleshooting hardware issues, understanding the proper steps to remove this component is crucial. This article will guide you through a precise, step-by-step procedure how to remove graphics card from motherboard.
Before diving into the process, it is important to gather the necessary tools and materials required for this task. Additionally, powering down your computer and disconnecting all cables is imperative to ensure safety during the removal process.
Once these preliminary steps are completed, you can proceed by removing the computer case cover. With the cover removed, locating and securing screws or clips that hold the graphics card are removed in place becomes possible. It is important to exercise caution when handling delicate components such as graphic cards, ensuring they are carefully removed from the motherboard.
By following these technical instructions precisely, you will be able to successfully remove a graphics card from your motherboard with ease and confidence.
Gather the necessary tools and materials
The first step in removing a graphics card from a motherboard involves gathering the required tools and materials, which may include a screwdriver, an anti-static wrist strap, and thermal paste remover. Before starting the removal process, it is essential to take precautions while handling delicate components.
This includes grounding yourself by wearing an anti-static wrist strap to prevent electrostatic discharge that could damage the sensitive electronics. Additionally, it is recommended to work on a clean and static-free surface to avoid any accidental damage.
Once properly equipped and prepared, best practices for cleaning the graphics card should be followed. It is important to remove any accumulated dust or debris using compressed air or a soft brush before proceeding with removal.
Care should be taken not to touch the gold connectors or other sensitive parts of the card during this process. Furthermore, if there is thermal paste present on the GPU chip, it should be carefully removed using a thermal paste remover solution and lint-free cloth.
By adhering to these precautionary measures and following proper cleaning techniques, one can safely proceed with removing the graphics card from the motherboard.
Power down your computer and disconnect all cables
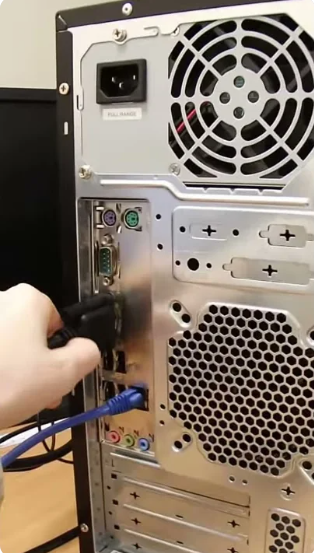
First, ensure that your computer is powered down and all cables are disconnected. To properly ground yourself before removing the graphics card, it is recommended to wear an anti-static wrist strap or touch a grounded metal surface to discharge any static electricity. This will help prevent any potential damage to sensitive electronic components.
Once you have grounded yourself, locate the graphics card on your motherboard. Gently press the release latch or screws securing the card in place and carefully remove it from its slot. Be cautious not to apply excessive force or bend any connectors during removal.
After successfully removing the graphics card, it is important to store it safely in an anti-static bag or foam-lined box to protect it from static electricity and physical damage. Remember to keep the removed card in a cool, dry place until needed again.
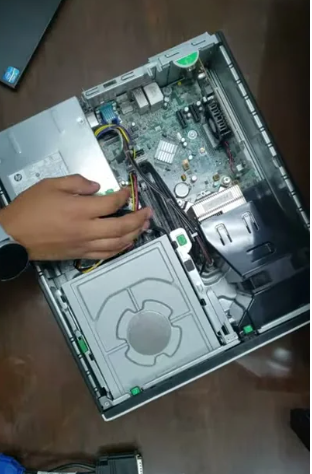
Remove the computer case cover
To access the inner components of your computer, gently detach the protective cover surrounding its internal structure. This step is crucial to safely remove and replace the graphics card. Here are three key points to consider when removing the computer case cover:
- Ensure that your computer is powered down and all cables are disconnected.
- Place the computer on a clean, stable surface to prevent any damage.
- Use a screwdriver or other appropriate tools to unscrew the screws securing the case cover.
Once you have successfully removed the computer case cover, you will be able to proceed with removing the graphics card. However, it is important to take certain precautions during this process:
- Ground yourself by touching a grounded metal object or wearing an anti-static wristband.
- Handle the graphics card with care, avoiding excessive force or bending.
- Follow manufacturer guidelines for removing and installing the graphics card.
By following these steps and precautions, you can safely remove your computer case cover and proceed with replacing your graphics card.
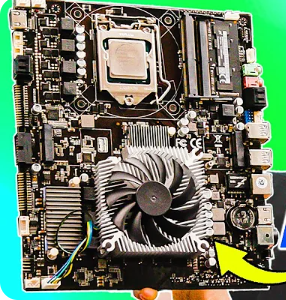
Locate and remove the securing screws or clips for the graphics card
After successfully removing the computer case cover, it is essential to locate and remove the securing screws or clips that hold the graphics card in place. This step is crucial when troubleshooting common issues with graphics cards or upgrading your graphics card for better performance.
To begin, identify the location of the screws or clips on the motherboard that secure the graphics card. Carefully unscrew or unclip them using a screwdriver or your fingers, depending on their design. Once all securing mechanisms have been loosened, gently pull out the graphics card from its slot by gripping its edges and applying even pressure.
Avoid touching any sensitive components on the card itself to prevent damage from static electricity. With these steps completed, you can now proceed to install a new graphics card or troubleshoot existing issues with your current one.
Carefully remove the graphics card from the motherboard
The next step in the process involves delicately extracting the graphics card from its designated slot on the motherboard, ensuring a cautious approach is taken to avoid any potential damage. To successfully remove the graphics card, it is important to follow these steps:
- Before proceeding, it is crucial to take antistatic precautions by wearing an antistatic wristband and working on a static-free surface.
- Gently grasp the edges of the graphics card and lift it straight up from the slot. Avoid applying excessive force or bending the card.
- If there are any securing clips or latches present, release them carefully before removing the card fully.
When troubleshooting common issues when removing a graphics card, consider checking for any obstructions that may be preventing its removal.
Additionally, ensure that all power cables and connectors have been properly disconnected before attempting to remove the graphics card. By following these guidelines and being meticulous in handling the graphics card, one can safely extract it from the motherboard without causing any damage.
Frequently Asked Questions
Conclusion
To remove the graphics card from the motherboard, begin by gathering the required tools and materials. Power down your computer and disconnect all cables. Remove the cover of the computer case. Locate and eliminate the securing screws or clips for the graphics card. Finally, cautiously detach the graphics card from the motherboard.
In conclusion, removing a graphics card from a motherboard involves following a precise step-by-step process. By ensuring that all necessary precautions are taken and following each step carefully, one can successfully remove their graphics card without causing any damage to their computer system.